Large Vs Small Diaphragm Condenser, What Are The Benefits They Can Provide?
April 18, 2022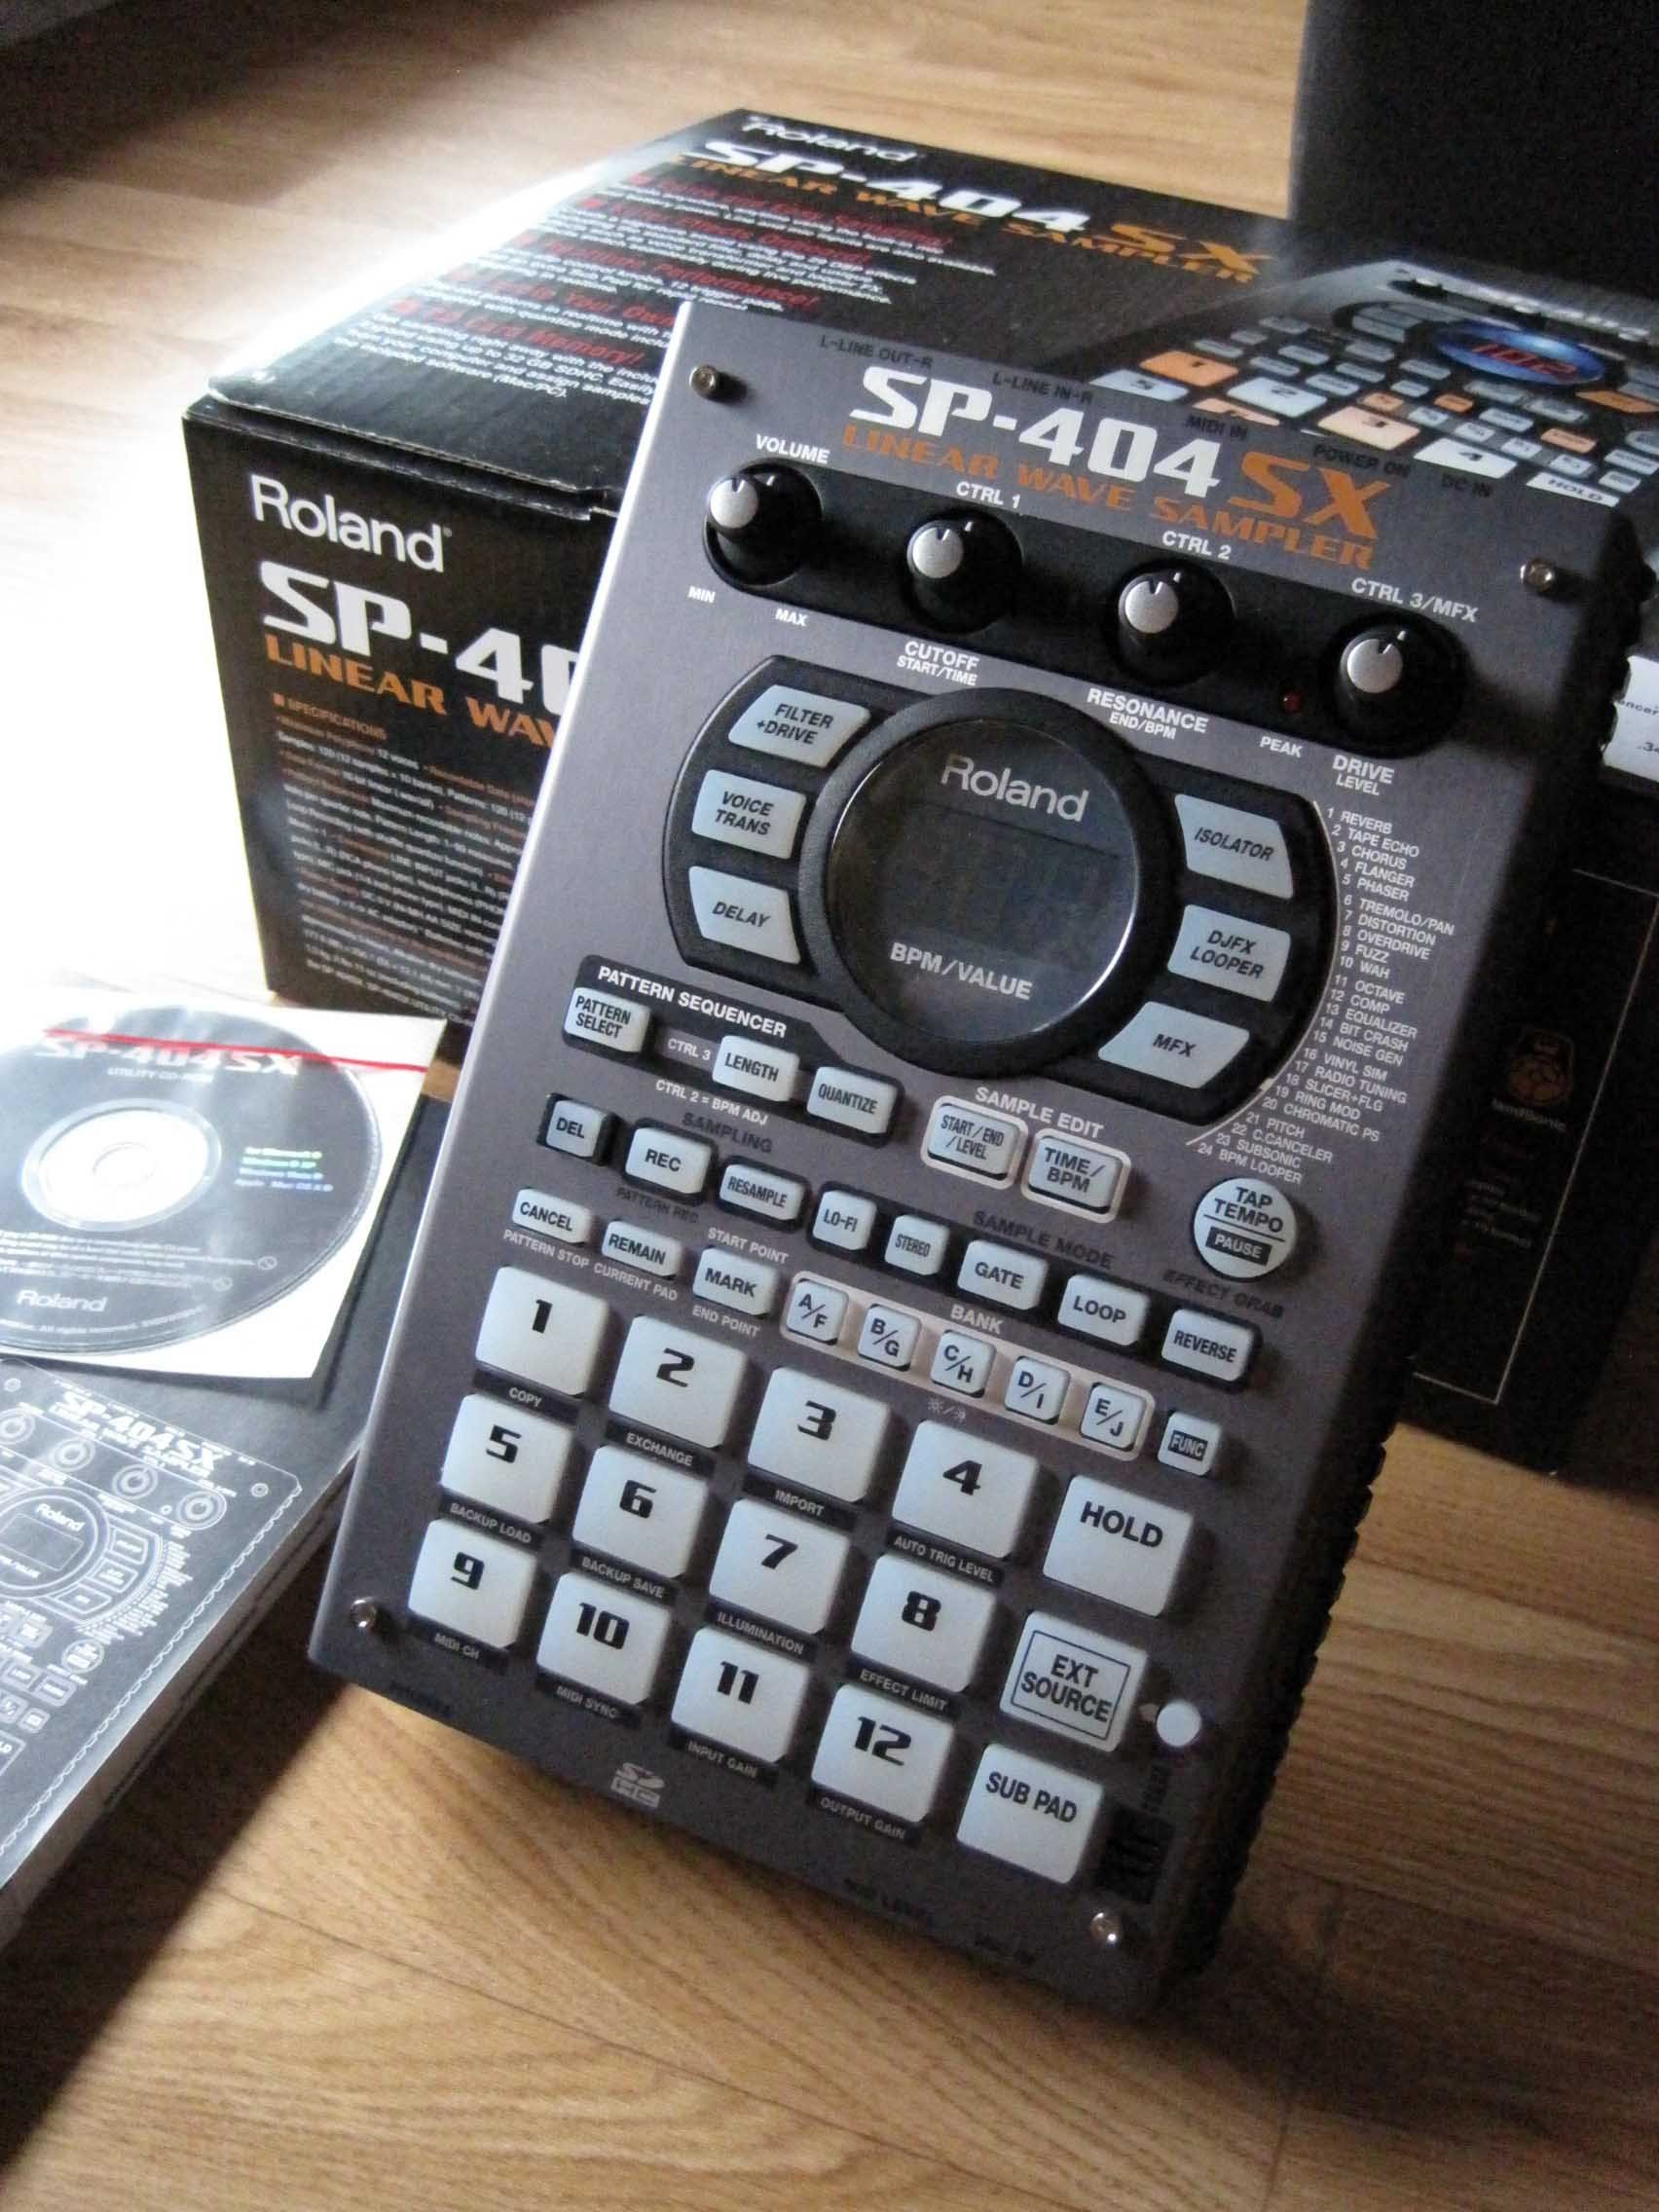
Why the SP404 Inspired a Generation of Beatmakers
April 29, 2022
In the world of digital and electronic music, MIDI is king.
It’s the universal language of almost all music produced using an instrument that needs to be plugged into a power source. If you use a DAW or any kind of hardware sampler or sequencer; chances are you’re already using MIDI, whether you know it or not.
How to use midi? While at first the idea of getting your instruments and software to speak to each other in this digital language. MIDI is quite simple to use and understand once you know how it works.
Regardless of whether you know nothing about MIDI or if you’re just starting to get the hang of it; today we’re here to help you master MIDI and make the most of your music software and gear.
What is MIDI?
So what is MIDI?
MIDI is a digital language used by a variety of music gear and software that allows them to communicate with each other. MIDI is particularly common in the realm of electronic-based music and anything that requires a computer.
While the idea of instruments being able to communicate sounds very futuristic; MIDI has actually been around since 1981 and first started seeing use in the mid 80s.
Since then it has been the most common way to lay down notes, sync bpm’s, and even get multiple instruments to play simultaneously.
MIDI can give an artist the dynamics of a whole band of musicians while performing and producing entirely on their own.
Elements of MIDI
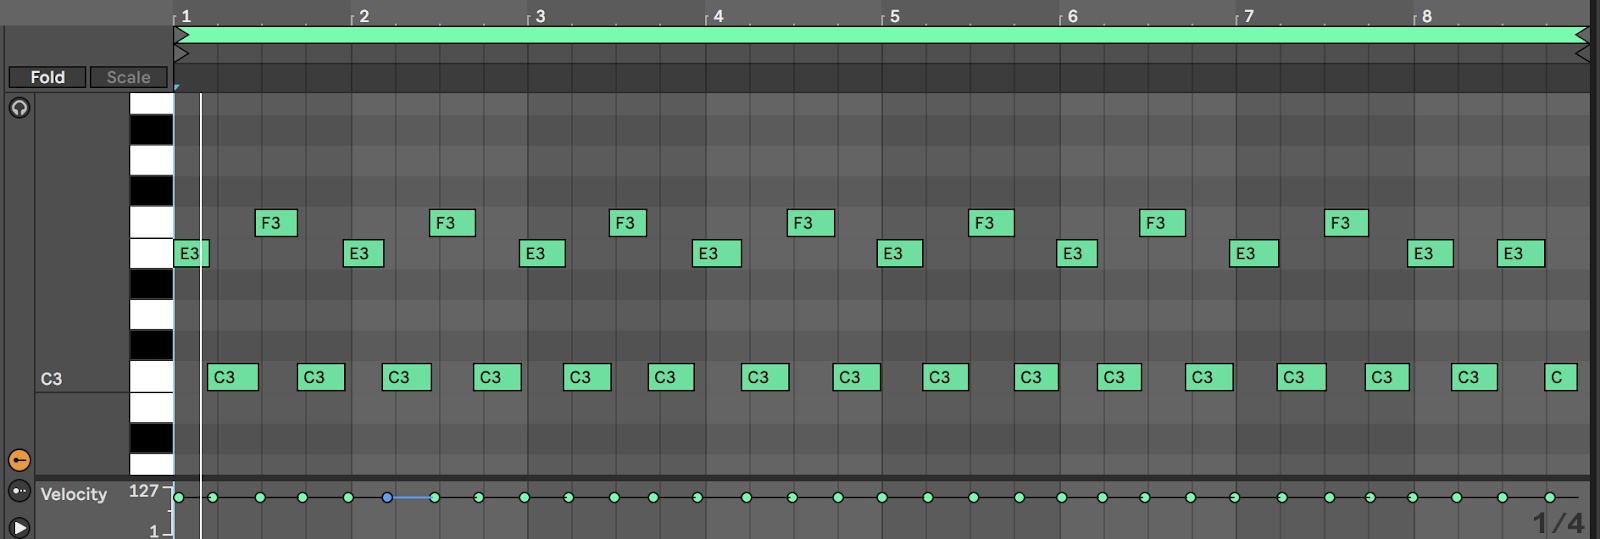
Notes
The most obvious piece of data that MIDI sends out is the note that you are playing. Unlike a piano where you’re limited to the keys in front of you, MIDI can be recorded as high or as low as you like. It records the note you played and creates a sequence as you continue to play.
Velocity
Not only does MIDI know what note you’re playing, but it also knows how hard you played it. This is used to make the volume of the note either louder or quieter.
Length
Length is exactly what it sounds like. Keep holding a note and the length of it will be extended.
Pitchbend
MIDI can also record pitch-bend data if your MIDI keyboard has a pitch knob. This allows you to roll your notes up or down in pitch in real time as you play.
Channels
Different MIDI channels allow you to send different information to different gear. Say you want to send note data to one device but only send the BPM to another? This can be achieved using multiple MIDI channels.
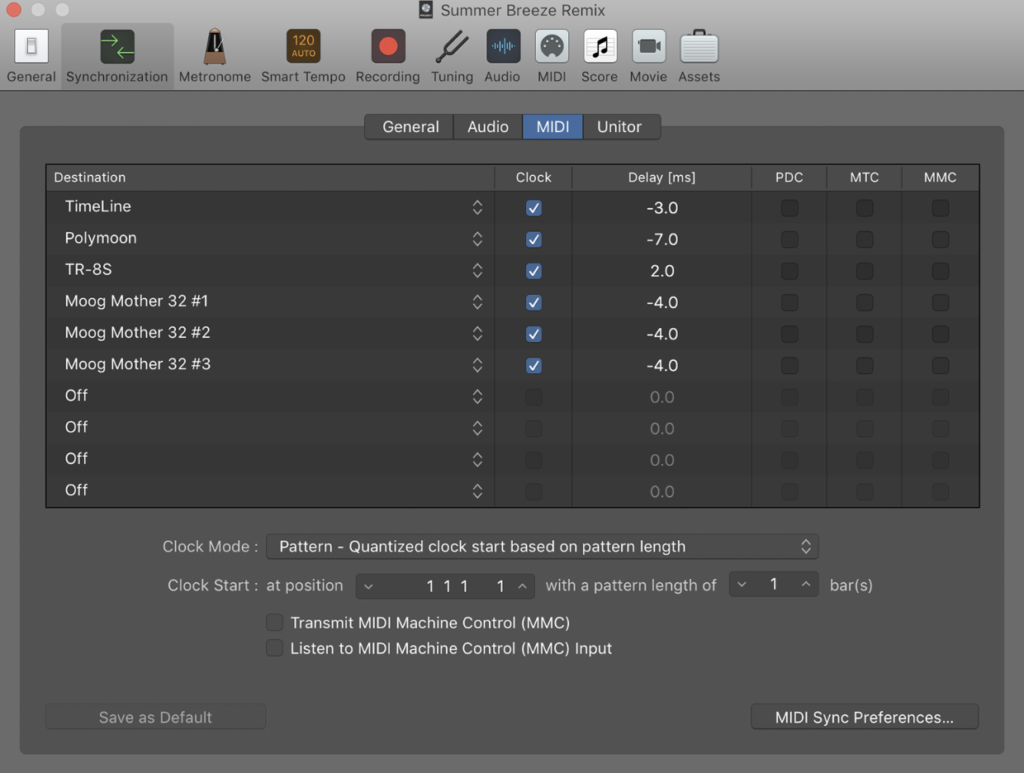
Clock/ Sync
One of the most useful MIDI features for solo artists is MIDI clock and sync. This allows you to choose a device to set a master tempo that the rest of your gear will sync up to. This also has the added bonus of being able to hit play on one device and have everything connected to it begin playing at the same time.
Midi Ports & Cables
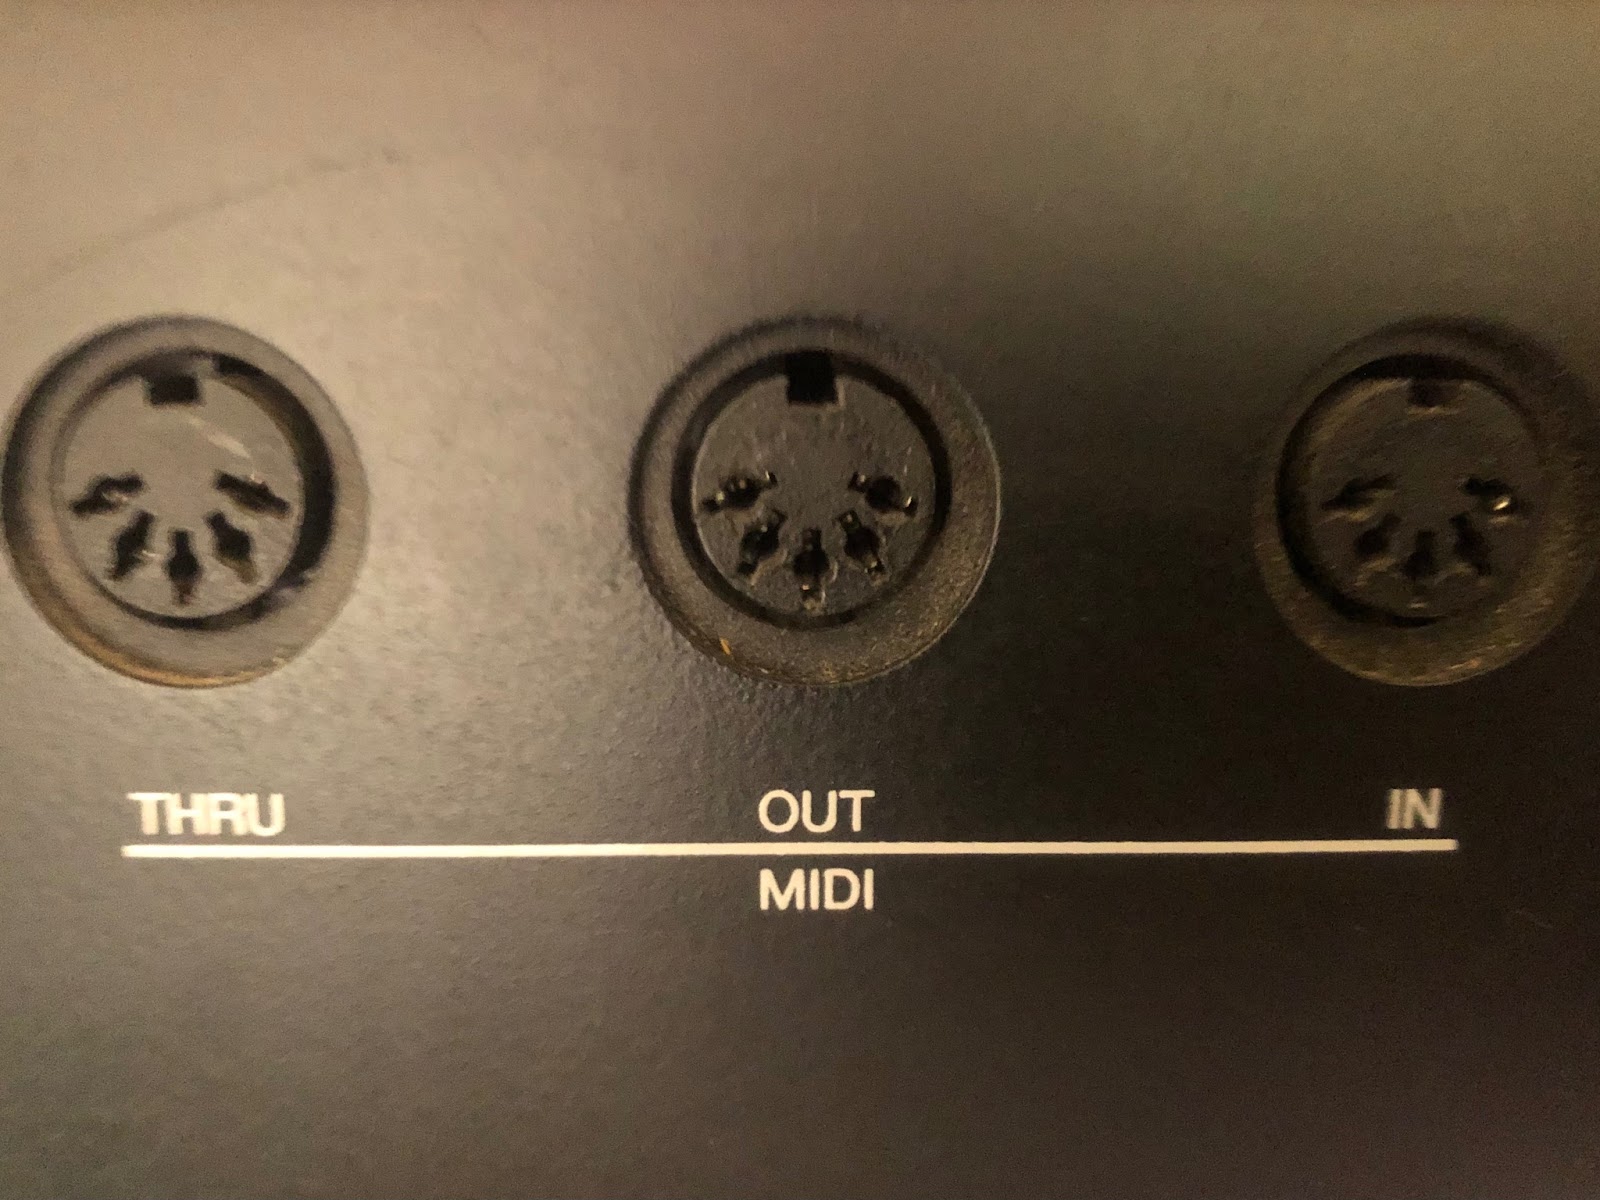
MIDI Ports
If you’ve got any hardware or an audio interface, chances are you’ve seen a MIDI port. They’re circular ports with 5 small holes running either along the top or bottom of the port. Which side the hole is on doesn’t make a difference and is only a nuisance when trying to plug your cables in a tight spot; much like putting a USB in the wrong way round.
There are 3 types of MIDI ports: Out, In, and Thru. Each serves their own purpose and can lead to moments of thinking “WHY ISN’T THIS WORKING!” Chances are that you’re plugging into the wrong port.
MIDI Out: Used to send MIDI data from your current device to another. You’ll use this one a lot on MIDI keyboards and hardware being used for your master tempo.
MIDI In: Used to receive MIDI information from another device. Commonly used to control virtual instruments in your DAW or link synths together to play the same notes.
Thru: This acts as a way to continue your MIDI chain without having the information passing through the device affect the device itself. Great for skipping certain MIDI information past a device in the middle of your setup.
MIDI Cables:
For a long time, there was only one type of MIDI cable, a simple MIDI to MIDI. While most MIDI enabled devices still use them, more recent gear has started to adopt MIDI to USB cables.
MIDI to USB cables simplify using MIDI by removing the need for an audio interface when using a sampler or midi keyboard with your computer’s DAW.
How MIDI Works
MIDI consists of different elements of data that are transmitted between devices in order for them to send and receive musical information.
MIDI itself produces no sound. Unlike a synthesizer which is an analog piece of gear that creates a sound when the keys are pressed; MIDI only sends the information of the key being pressed. Sounds strange but bear with me.
How to use MIDI:
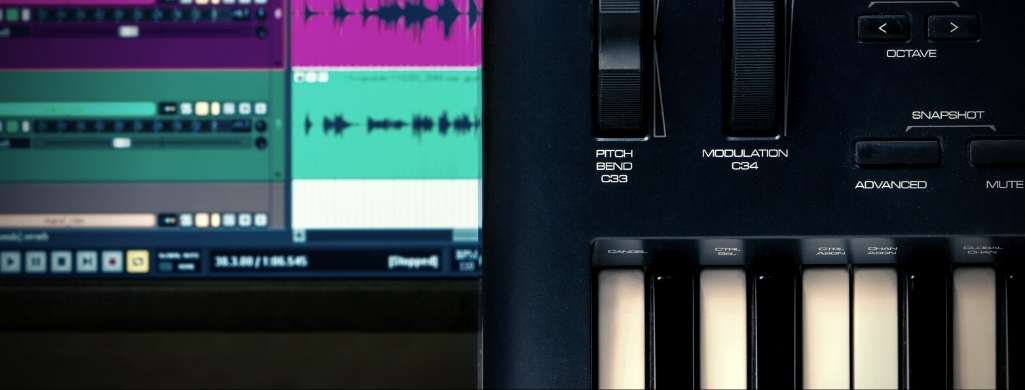
How to use a MIDI keyboard
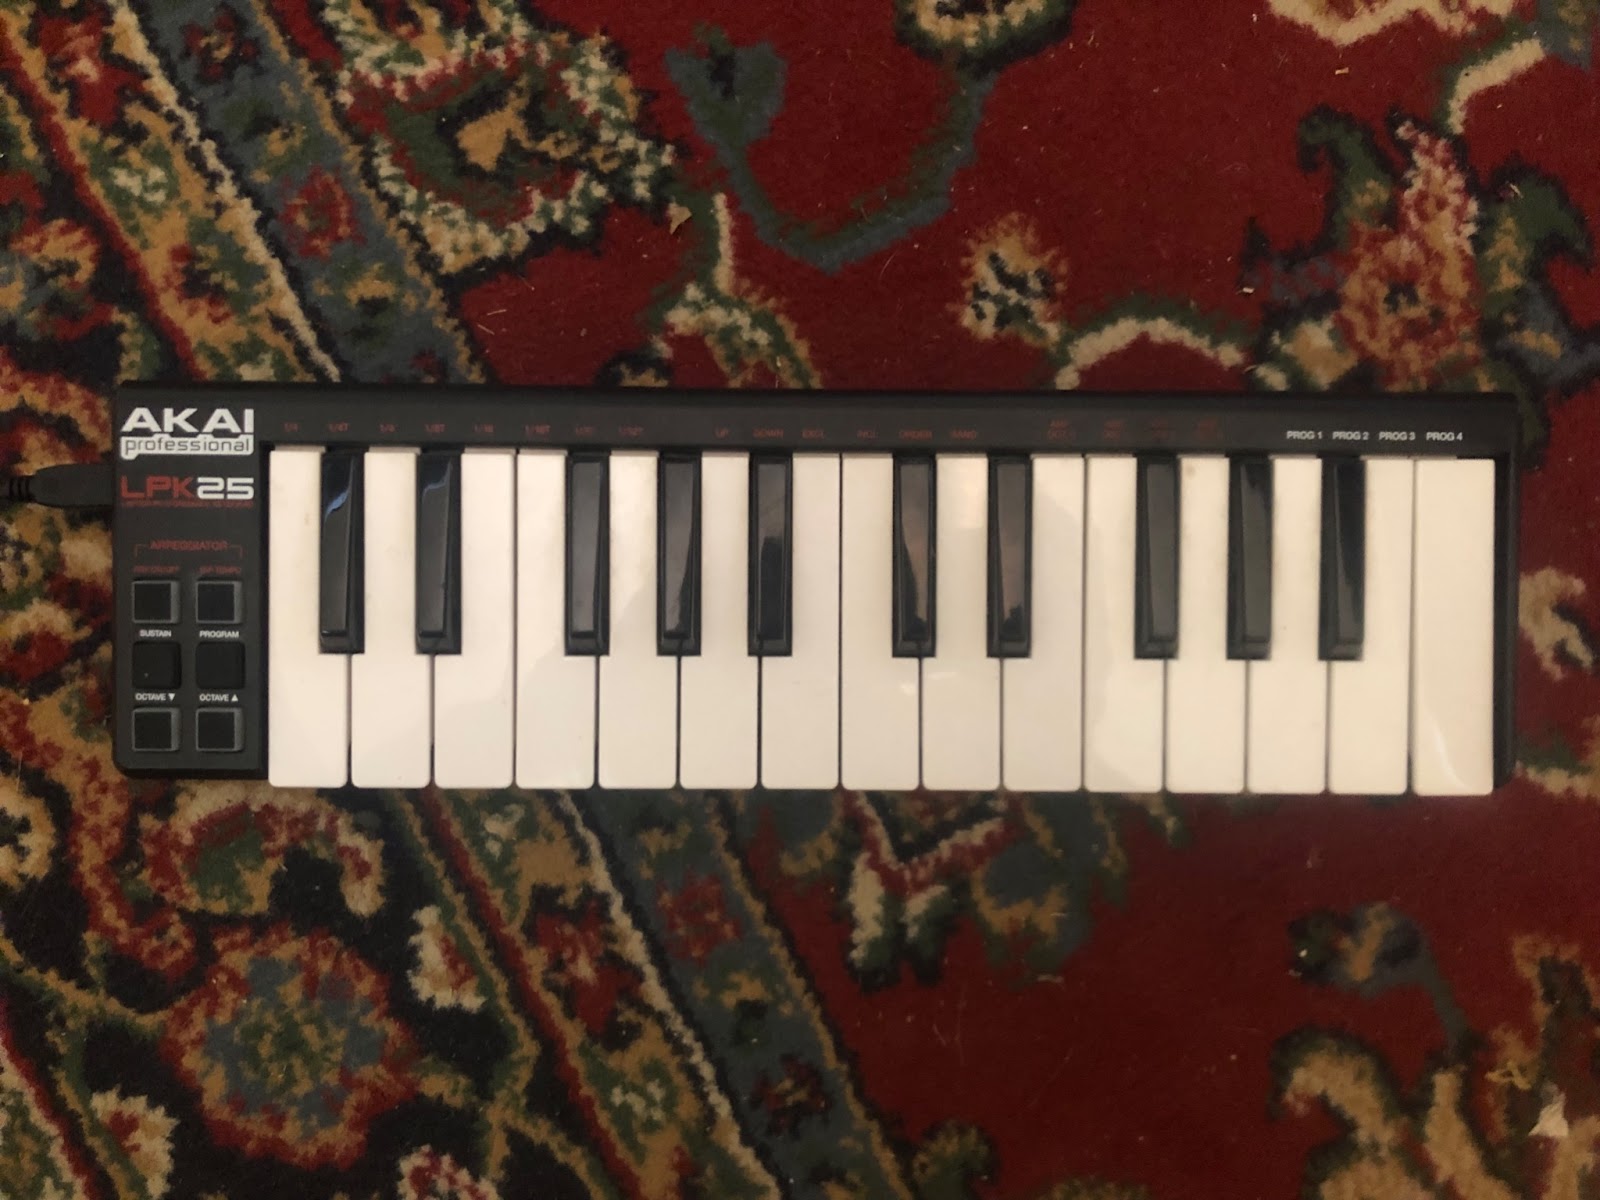
The most common piece of MIDI equipment is a MIDI keyboard and understanding how they work will give you a pretty clear idea of how this technology works.
When you press a key on a MIDI keyboard that is connected to a let’s say a DAW like Ableton Live, that input is shot out of your MIDI keyboard as digital information.
This information is then received by other MIDI enabled gear in this case your DAW. Everything from the note to the way you pressed it is sent instantly to your DAW and recorded into a MIDI track.
For the sake of simplicity let’s say you add one of Ableton’s default virtual instruments to that MIDI track.
The recorded MIDI information will then PLAY that virtual instrument exactly as you played it on your MIDI keyboard.
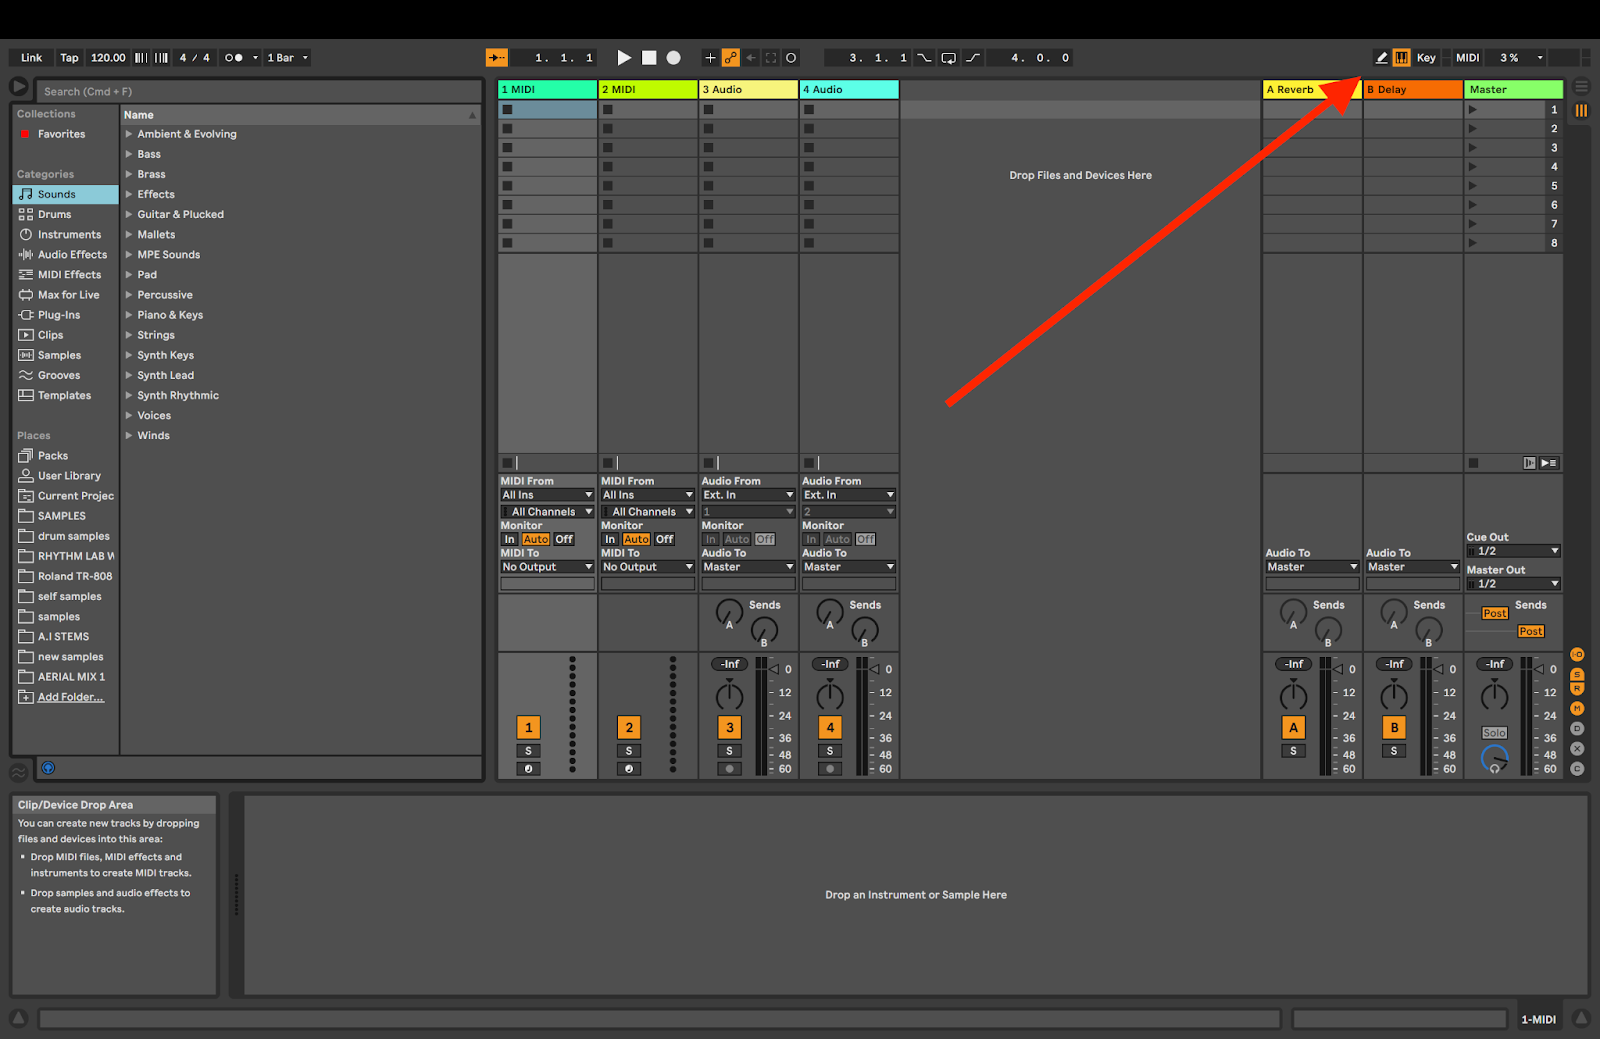
How to use MIDI keyboard with Ableton Live 11
To connect your MIDI keyboard to Ableton Live follow these steps:
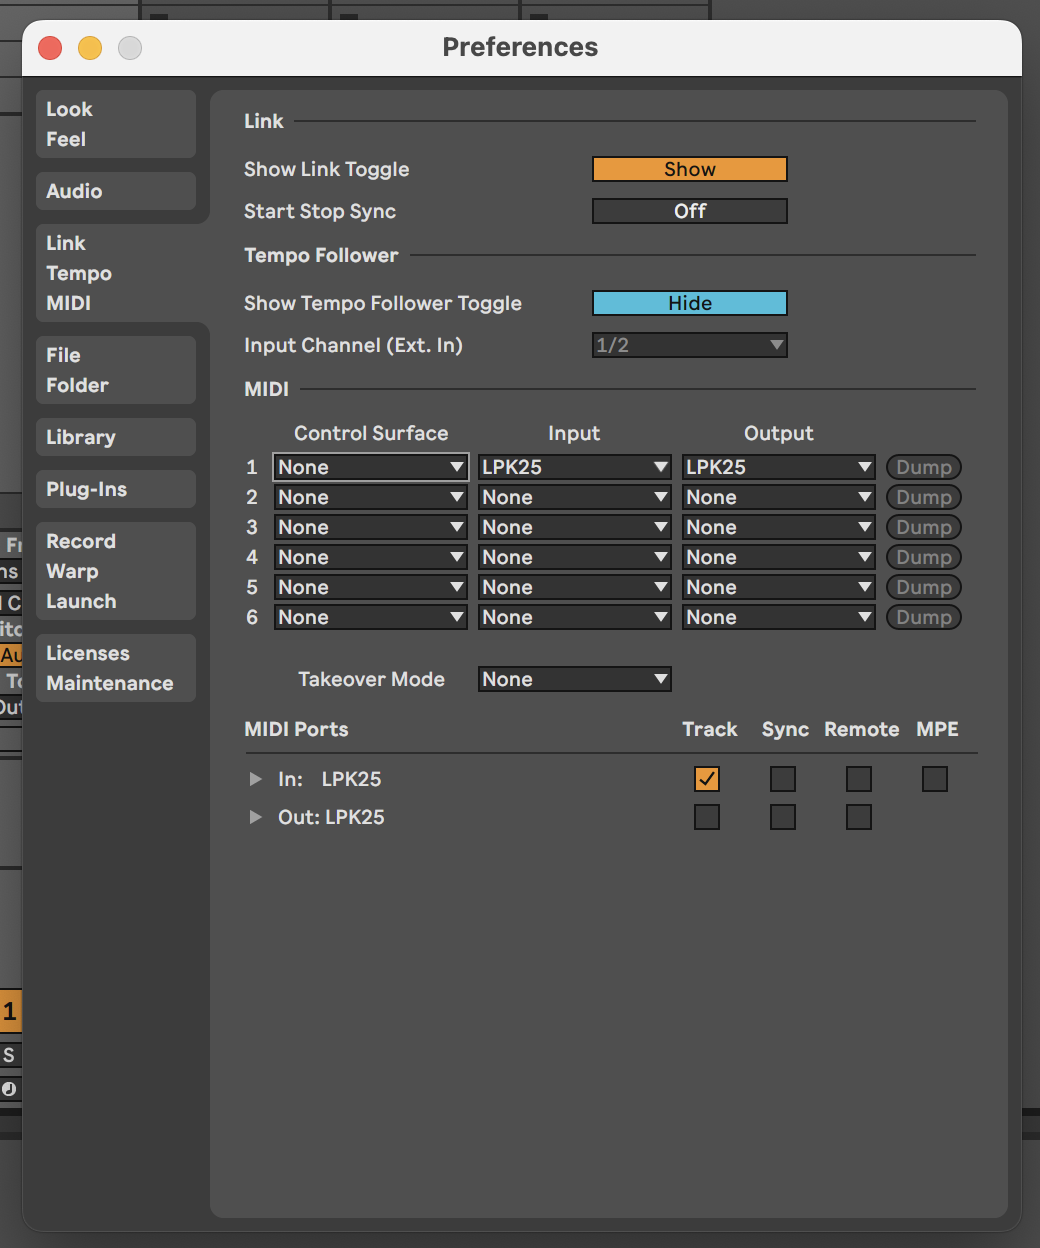
- Connect your MIDI keyboard to your computer via USB or MIDI cable and audio interface (make sure to plug into the INPUT MIDI port).
- Launch Ableton Live
- Go to the preferences settings menu of Ableton.
- In the MIDI tab find ‘control surface’.
- In the drop down menu select the name of your MIDI keyboard from the list.
- Close preferences and create a new MIDI track by pressing CMD+SHIFT+T.
- Arm the midi track to record with the record button at the bottom of the track.
- Choose the virtual instrument you want to use MIDI to control.
- Vola! Your all set.
How to use MIDI keyboard with FL Studio 12
To use a MIDI keyboard with FL Studio 12 follow these steps:
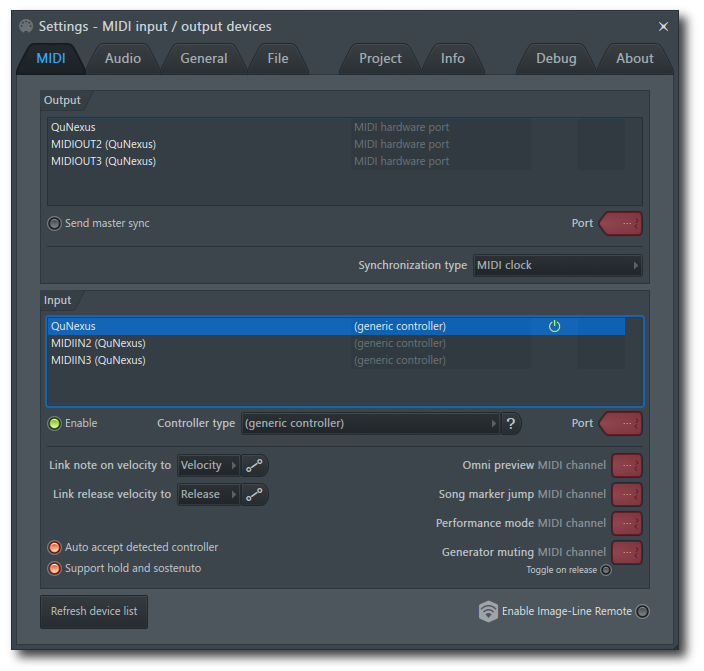
- Connect your MIDI keyboard to your computer via USB or MIDI cable and audio interface (make sure to plug into the INPUT MIDI port).
- Install any drivers that pop up when connected. Some computers already have generic drivers installed and no extra drivers are needed.
- Launch FL Studio
- Open settings and navigate to the MIDI tab.
- Under Input select your USB keyboard (it may be called USB Audio Device)
- Click the enable button below the list of MIDI devices
- Close settings
- Create and arm a new MIDI track
- All done! You’re good to go.
How to use MIDI keyboard with Logic Pro
Logic Pro is also compatible with MIDI keyboards, here’s how you can connect one.
- Connect your MIDI keyboard to your computer via USB or MIDI cables and audio interface (make sure to plug into the INPUT MIDI port)
- Launch Logic Pro
- Navigate to the preferences menu of Logic
- Select the Control Surfaces menu
- Click the ‘Setup’ button
- Click the ‘New’ button
- Click ‘Install’
- Select your MIDI keyboard from the list of MIDI devices.
- Click ‘Scan’
- Close the preferences menu.
- Once installation is complete and create a new ‘Software Instrument’ track
- Click on an empty plugin slot on the new track
- Go to track configuration
- In the drop down menu select your MIDI keyboard from the list.
- Click on the MIDI channel menu and select all.
- Click the input drop down menu and choose ‘1,2’
- You’re all set! Arm the track for recording and record your MIDI keyboard
How to use your computer keyboard as a MIDI controller
While a MIDI keyboard gives you a lot more control over your performance, sometimes when you’re on the go or strapped for space, you won’t be able to set one up.
Luckily you can use the keys on your computer to create MIDI data. To turn your keyboard into a MIDI keyboard make sure you have a MIDI track set to record.
Next, enable ‘Piano Keyboard’ mode in your DAW. This is typically found in the top left corner of your DAW and is represented by a small piano keys icon.
Using MIDI to Connect and Sync Hardware
Before DAWs were even invented producers have been using MIDI to create dynamic and multi-layered electronic music using samplers and sequencers. Being able to make them talk to each other revolutionized digital based music forever and any piece of hardware worth its salt will have 1 MIDI input at the very least.
To get your hardware talking you need to understand the (insensitively named) master and slave dynamic that MIDI creates with hardware.
The master device will act as the control center of your setup. It dictates what notes will be played by other gear and can set the bpm across multiple devices.
The slave device will take the information received by the master device and act upon it.
To set this in motion follow these steps:
- Plug a MIDI cable into the MIDI out on your master device.
- Plug the other end of the cable into the MIDI in on the slave device.
- On the master device navigate to the MIDI settings menu
- Choose which channel you want to send your MIDI out to. 1 – 16, remember which you picked because you’ll need to match it on the other device.
- Choose the type of information you want to send to your other device. (This will typically be Chromatic information for notes and clock/sync information to sync the BPM).
- Navigate to the MIDI settings of your slave device.
- Select MIDI input settings and choose the channel you want to receive MIDI from (the same channel you selected on the master device).
- You’re all set!
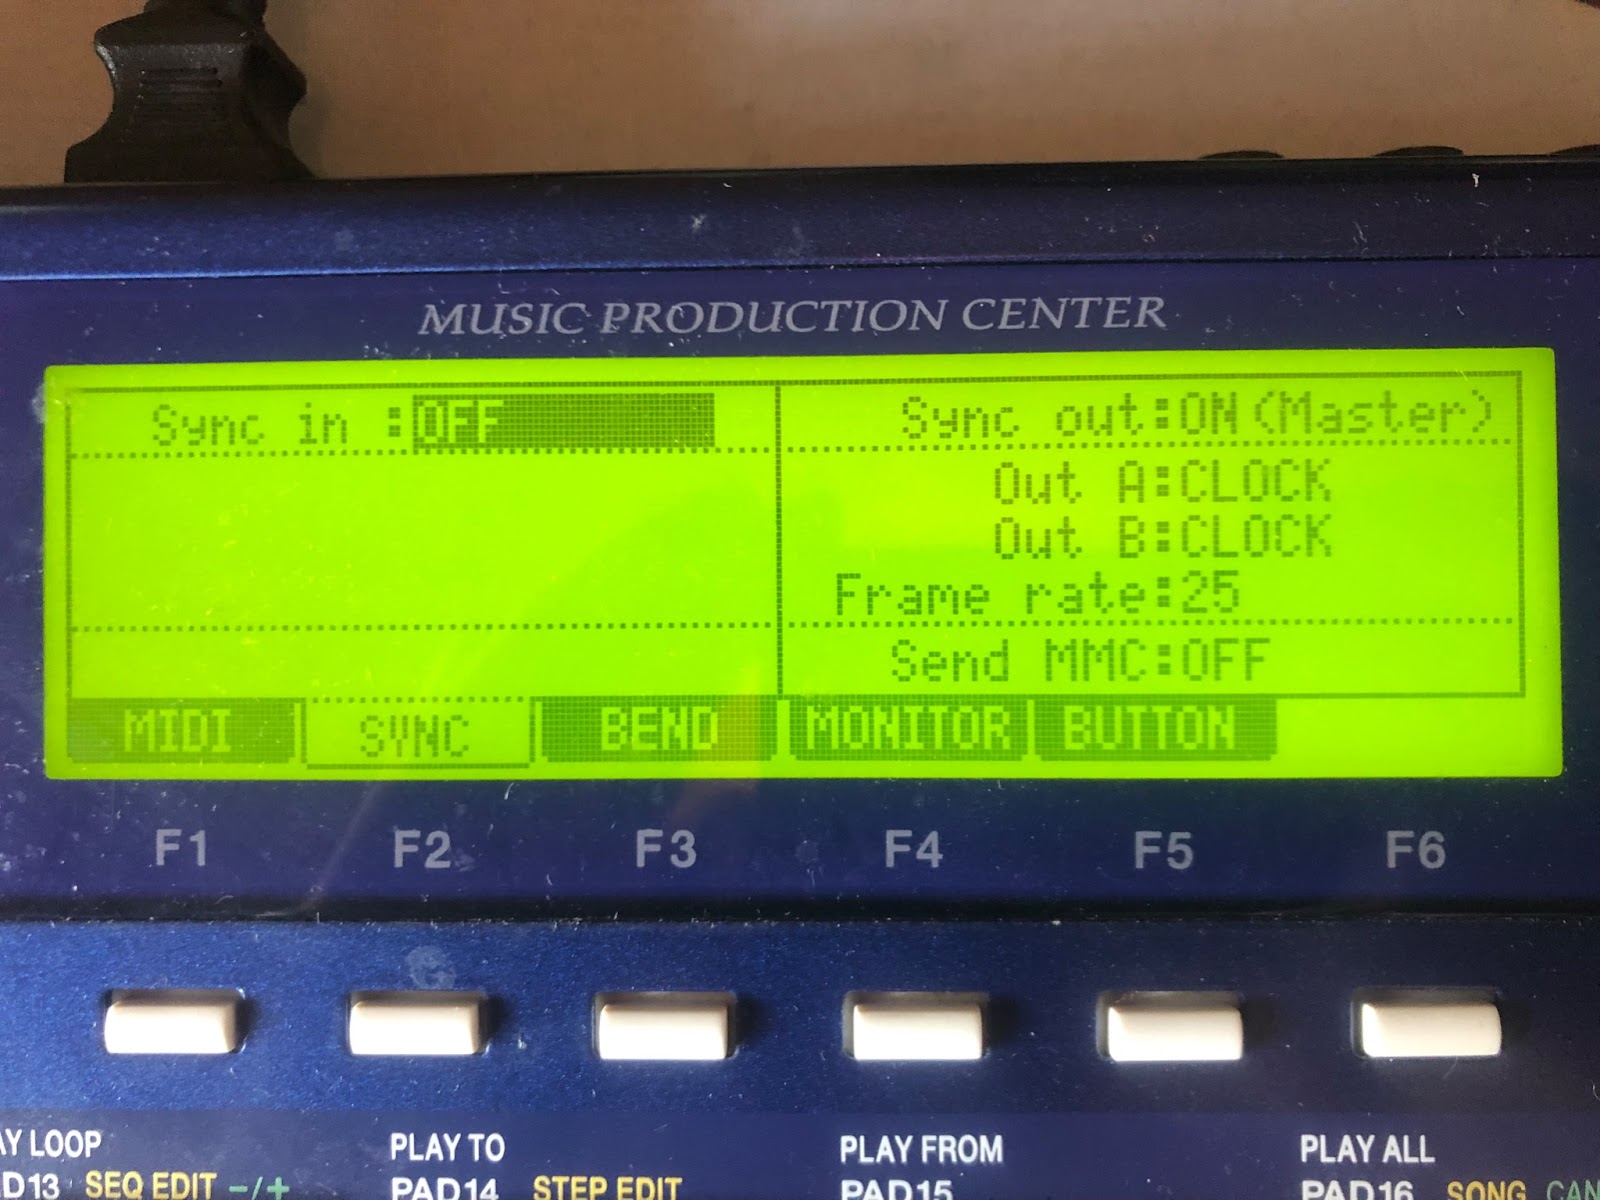
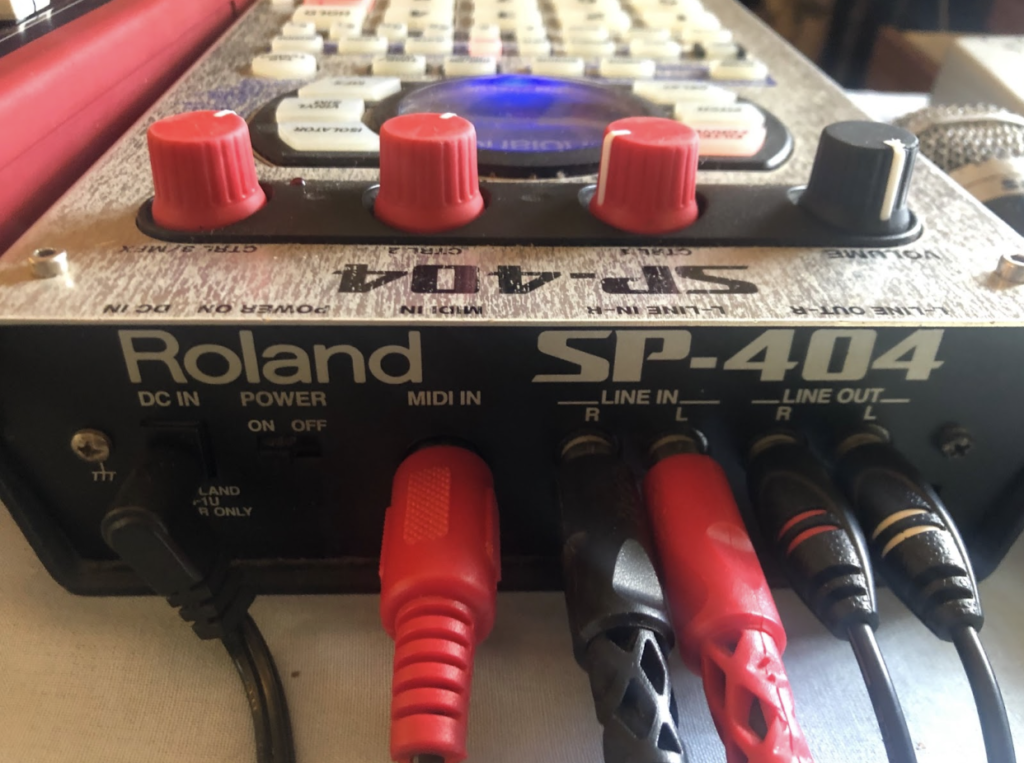
A practical example of this would be setting up an MPC and an SP-404 to work together. In this case, I will use the MPC as the master device. Using the MPC as a master will allow you to create pad patterns on your MPC and have those patterns played on your SP-404.
It also means that pressing play on the MPC will trigger the latest pattern you played on the SP-404 at the BPM set up the MPC.
How to connect hardware and synths with a DAW using MIDI
If you’re primarily a computer based producer that wants to start incorporating some hardware into your workflow then you might be wondering how to get your hardware to record in time with your DAW based projects.
Fortunately, most DAWs have already thought about this for you and made the process a simple one. This comes in handy when wanting to record sequenced hardware drums and sample pads in particular.

To connect your hardware to your DAW you will need to have an audio interface with a MIDI out port. If you’ve got one follow these steps to add some analog texture to your tracks.
- Connect your audio interface to your DAW.
- Launch your DAW and turn on the hardware you want to connect.
- Plug a MIDI cable into the MIDI output of your audio interface
- Plug the other end of the MIDI cable into the input on your hardware.
- Navigate to the MIDI settings of your DAW
- In the MIDI settings select a MIDI channel and add your audio interface from the OUTPUT list or drop down menu
- On your hardware navigate to the MIDI settings
- Select MIDI input and set it to the same channel you picked on your DAW and set it to slave mode.
- Close the MIDI settings menu on both your DAW and hardware.
- Your DAW will now control the BPM and playback start of your hardware.
How do you use MIDI for beginners?
The most straightforward way to use MIDI for a beginner is with a USB MIDI controller. These controllers typically feature a keybed and sometimes come with a few drum pads and automation knobs.

These controllers are very compatible with popular DAWs such as Ableton, FL Studio, and Logic and require no setup once they’re plugged into your computer’s USB port.
Once plugged in, navigate to the MIDI settings of your DAW and choose the USB MIDI device from the controllers drop down menu.
Now create a new MIDI track and arm it to record. To give it a test choose a virtual instrument and start banging out some keys. You’re now a MIDI keyboard wizard! Simple right.
Converting Audio to MIDI
Let’s say you have a piano or guitar recording that you want to translate to a MIDI melody to use with a synth or virtual instrument. You want a quick way to convert the notes you played to MIDI data so that you can experiment with the melody on different MIDI instruments.
Well, there is a quick and easy way to do this in a variety of DAWs. Here I will explain how to do it on both Ableton and FL Studio
Converting Audio to MIDI in Ableton
- Drop your audio sample into an audio track
- Left click the sample and about halfway down the drop down menu you will see 4 MIDI options
- For audio, you want to choose from Convert Harmony / Melody / Drums to new MIDI track
- To convert chords select Convert Harmony to new MIDI track
- To convert single notes select Convert Melody to new MIDI track
- To convert a drum beat select Convert Drums to new midi track
- Once selected a loading bar will appear and a new MIDI track will be created with your audio recording turned into MIDI information.

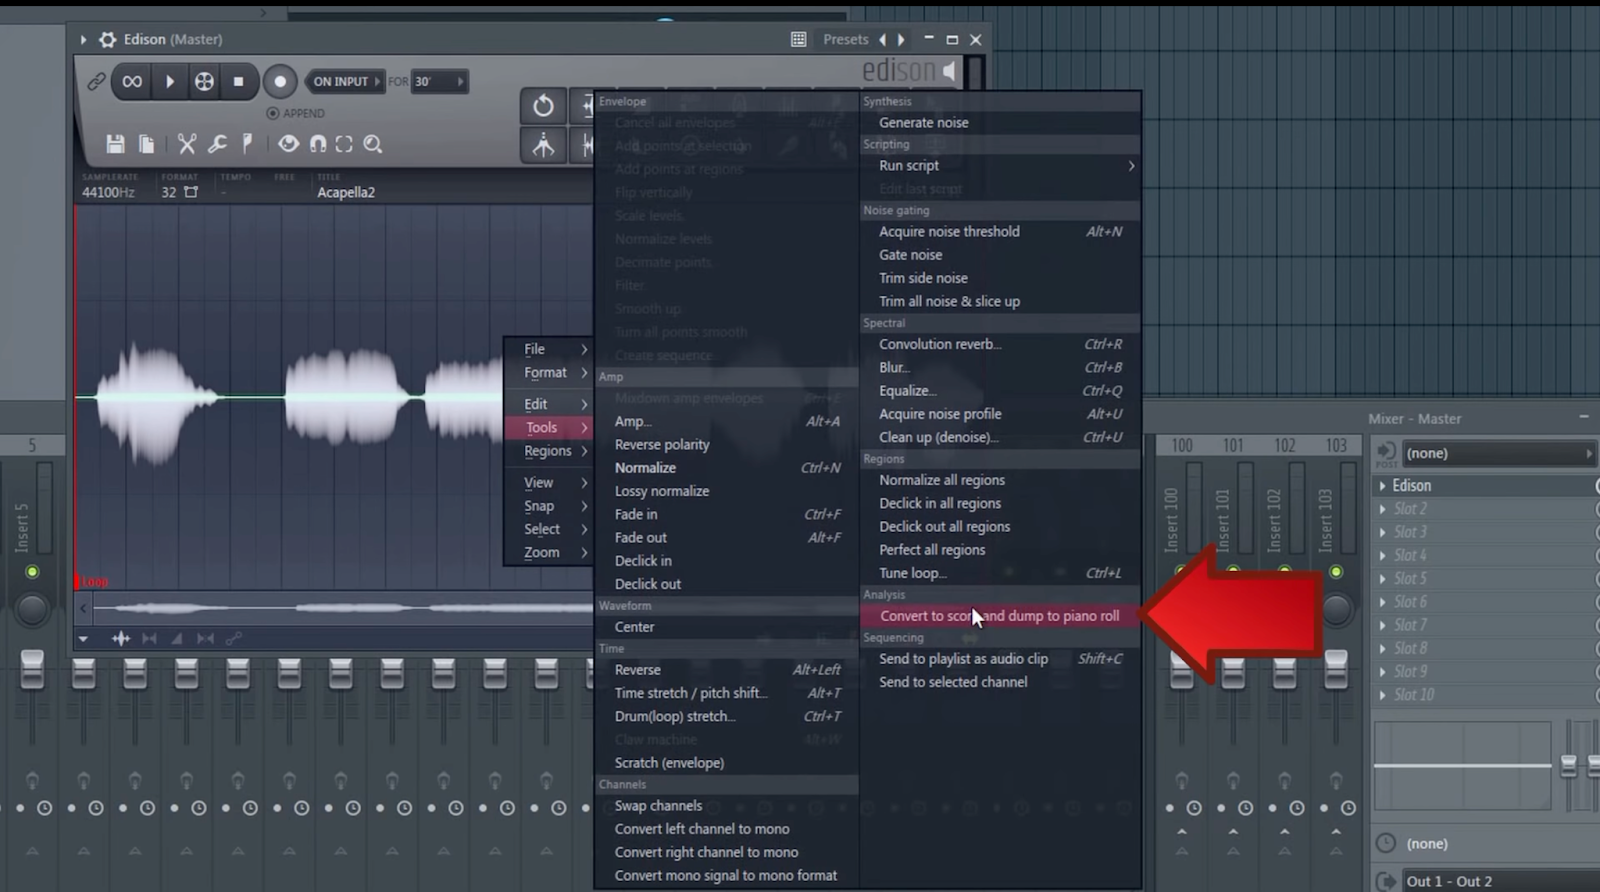
Converting Audio to MIDI in FL Studio
- Drop your audio sample into a track while in arrangement view
- Left click the corner of the sample.
- In the drop down menu click ‘Edit sample’.
- This will take you to Edison where you can choose the part of the audio you want to convert
- Select the pattern and channel you want to convert to MIDI to
- Right click on the sample while in Edison and in the tools section of the drop down menu select ‘Convert score and dump to piano roll’
- The audio will be converted to MIDI in a new piano roll of a new track.
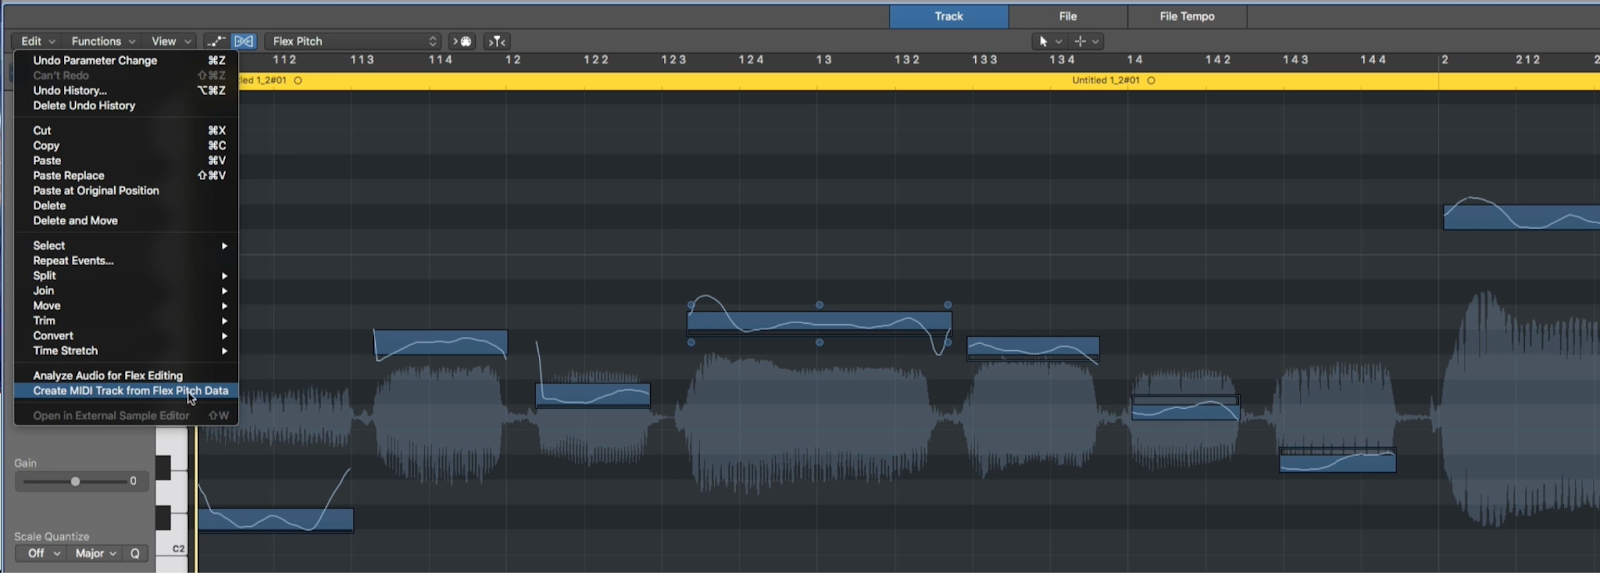
Converting Audio to MIDI in Logic Pro
- Double click the audio that you want to change to MIDI to open the Audio Track Editor.
- Click Show/Hide Flex button in the menu bar.
- Click Flex Pitch from the Flex mode pop-up menu.
- Click Edit -> Create MIDI Track from Flex Pitch Data
- A new instrument track will appear in the arrangement view with your converted MIDI data.